Capturing stunning images at night presents unique challenges that can markedly enhance a photographer’s skills. Using the right camera settings, like adjusting the ISO, aperture, and shutter speed, significantly improves night photography results. Effective techniques can transform dimly lit scenes into visually striking photographs, drawing the viewer’s eye.
Understanding how to utilize available light sources is key. Whether it’s streetlights, neon signs, or the moon, these elements can add depth and ambiance to night shots. Additionally, employing a tripod ensures stability and reduces blurriness, allowing for sharper images even in low light conditions.
With the right approach and some helpful photography tips, anyone can master the art of night photography. Experimenting with different settings and compositions can unlock a world of creative possibilities after dark, encouraging photographers to explore the beauty that illuminates the night.
Understanding Night Photography Basics
Capturing stunning images at night requires knowledge of essential camera settings. Key factors include ISO adjustment, aperture selection, and shutter speed management.
The Role of ISO in Low Light
ISO settings are crucial in night photography. High ISO values, such as 1600 or 3200, enhance sensor sensitivity, allowing the camera to capture more light. This is essential in dark environments.
However, increased ISO can introduce noise, which may compromise image quality. Photographers should strive for a balance between adequate brightness and acceptable noise levels.
Using manual mode can help adjust ISO precisely. A DSLR or mirrorless camera typically offers a range of ISO settings, allowing flexibility based on lighting conditions. Testing various ISO levels helps identify the optimal setting for each night scene.
Aperture Settings for Maximum Light
Aperture determines how much light enters the camera. Wide apertures, represented by smaller f-numbers (e.g., f/1.8 or f/2.8), allow more light to reach the sensor. This is particularly beneficial in low-light settings, enhancing the exposure of dimly lit subjects.
Aperture priority mode enables the photographer to set the desired aperture while the camera automatically adjusts shutter speed. This mode is useful when capturing moving subjects against a night backdrop.
Choosing the right aperture can also affect the depth of the field. A wide aperture blurs backgrounds, bringing focus to the subject. By experimenting with different settings, photographers can create artistic effects and highlight particular elements in their images.
Shutter Speed: Capturing Motion and Stillness
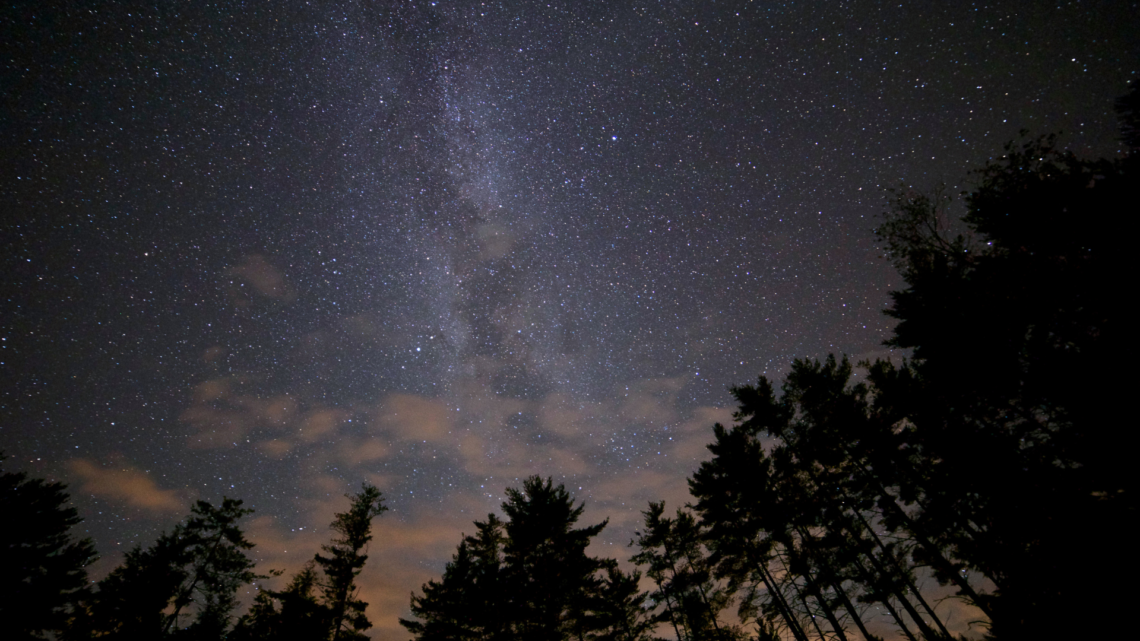
Shutter speed significantly influences exposure and the representation of motion. Slow shutter speeds, such as 1 or 2 seconds, can create light trails from moving subjects, ideal for capturing cityscapes or star trails.
Using bulb mode allows for longer exposures, giving photographers control over shutter duration. A tripod is essential for stability to avoid motion blur during these extended exposures.
Conversely, faster shutter speeds, like 1/60 or 1/125 seconds, freeze motion, making them suitable for capturing sharp images of dynamic scenes at night. Understanding how to manipulate shutter speed is vital for achieving the desired artistic or documentary effect in night photography.
Equipment Essentials for Nighttime Shots
Capturing great nighttime images requires specific equipment tailored to low-light conditions. Key tools include sturdy tripods, suitable lenses, and additional accessories that can enhance the overall quality of nighttime photography.
Choosing the Right Tripod
A reliable tripod is essential for nighttime photography to ensure stability and eliminate camera shake. A sturdy model, such as those made from aluminum or carbon fiber, offers both durability and portability. Look for tripods that extend to the desired height while being able to withstand wind and uneven terrain.
Features such as adjustable leg angles and a quick-release plate are beneficial. The tripod should support the weight of the camera and lens combination securely. This stability is crucial for long exposure shots, often required in low light.
Selecting Your Lens for Night Scenes
The right lens significantly impacts nighttime photography. Fast lenses with wide apertures (f/2.8 or lower) capture more light, making them ideal for low-light scenarios. Prime lenses offer superior image quality and can be lightweight, which is advantageous for extended shoots.
Wide-angle lenses enable expansive shots of landscapes or architecture under night skies. Conversely, telephoto lenses can capture distant subjects with clarity. The choice of lens depends on the intended composition, but having at least one fast lens is vital for versatility.
Additional Equipment to Enhance Night Images
Beyond the tripod and lens, additional tools can greatly enhance night photography. A remote shutter release reduces camera shake during long exposures. This accessory is especially useful for nighttime scenes where even the smallest movement can blur the image.
A flashlight can assist in setting up the scene or for light painting techniques. Consider using colored filters for creative lighting effects in the frame. Each of these tools contributes to achieving sharp, dynamic images in low-light conditions, making them valuable additions to any nighttime photographer’s kit.
Techniques for Capturing the Night
Capturing stunning night photographs requires specific techniques to manage low light, movement, and composition. Mastering these aspects can lead to striking images that highlight the beauty of nighttime scenes.
Mastering Long Exposures and Reducing Blur
Long exposures are essential for night photography as they allow more light to hit the sensor. Using a slow shutter speed, typically between 10 to 30 seconds, is common. This captures fine details in low-light conditions, such as star trails or city lights.
To minimize camera shake, a sturdy tripod is crucial. It stabilizes the camera and prevents motion blur. Adding a shutter release cable will further mitigate the risk of shake during the shot.
For additional control, consider utilizing image stabilization features, if available. This helps reduce vibrations from handling the camera. Experimenting with different exposure times can dramatically affect the outcome, so testing various settings is advisable.
Composition and Dynamic Range in Darkness
Good composition in low light focuses on utilizing available light sources. Street lights and city lights can highlight subjects, creating striking contrasts. Using leading lines can guide the viewer’s eye through the image, while negative space emphasizes the main subject.
Dynamic range is critical to capture detail in both highlights and shadows. Employing exposure bracketing allows photographers to take multiple shots at different exposures. This results in a composite image that retains detail in varied lighting.
Consider framing silhouettes against bright backgrounds for added drama. Depth of field can be adjusted to isolate subjects or include interesting backgrounds, which enhances storytelling in night photography.
Focusing Techniques for Sharp Imagery
Achieving sharp focus at night can be challenging due to low light conditions. Using manual focus is often more effective than relying on autofocus in the darkness. This allows for precise control over focus points.
If the scene contains light sources, they can assist with focusing. Positioning the camera to align with street lights or similar objects can help ensure clarity in the image.
For scenes where depth of field is essential, a wider aperture may blur out distractions in the background while keeping focal points sharp. Taking time to assess focus before capturing images is key to ensuring clarity and sharpness throughout the photograph.
Post-Processing and Final Touches
After capturing images at night, post-processing plays a crucial role in enhancing clarity and adjusting tonal qualities. This stage includes correcting color casts, improving white balance, and utilizing editing software to achieve the best results.
Adjusting Images for Optimal Clarity
When working with low-light photography, clarity can sometimes suffer due to noise and lack of detail. Using software like Snapseed or Lightroom, adjustments are essential.
- Shoot in RAW: Starting with RAW files preserves image details, allowing for significant post-processing adjustments.
- Correcting Exposure: If images appear too dark or too bright, exposure adjustments can help balance the light without losing detail.
- White Balance: This aspect is critical for accurate color representation. Adjustments can reduce color casts introduced by artificial light sources.
- Noise Reduction: Low-light photos often have grain. Employing noise reduction tools can enhance image quality while maintaining detail.
These steps enable the creation of clearer, better-quality night images.
Techniques for Artistic Night Photography
Conveying creativity in night photography often involves unique post-processing techniques.
- Exposure Bracketing: Taking multiple shots at different exposures allows for better highlights and shadows. Combining these images can create a balanced final photo.
- Black and White Images: Converting night photographs to black and white can evoke emotion and emphasize shapes and textures lost in color.
- Color Adjustments: Beyond correcting color casts, creatively manipulating colors can lead to striking artistic effects.
- Layering: Merging different images or altering aspects within a single photo can create eye-catching compositions.
These artistic adjustments can transform standard night scenes into captivating visuals.